 |
|
Tutorial
 Hello Ball Hello Ball
Interface Guide
Visual-Code Associations
Drawing Area
Code Windows
Text Area
Code Margin
Reference
Drawing Toolbar
Keyboard Shortcuts
Welcome! Kaleido is a programming environment interface that was created to make it easier for visual-thinkers to develop applications by providing the means to create personal meaningful visual interfaces to their own code. While many software engineering tools exist to automate code visualization, we wanted a tool that could allow individuals to visually plan, organize, and navigate through code in the idiosyncratic way we each think. We thought that, if so many of us make napkin sketches to lay out our thoughts before we program, why don't we build a tool that allow ourselves to use these sketches as an interface to our code?
The first part of this guide is a simple and fun tutorial to demonstrate some of the ways Kaleido can help you in the coding process. The second half explains each of the different parts of the interface in further detail, and includes a comprehensive listing of the available keyboard shortcuts. You can also look at the example projects provided with the Kaleido application package by accessing them from the File → Example menu.
Kaleido is based on the Processing project, acting as an augmented interface for the Processing Development Environment and the Processing Language. This guide assumes you’re already familiar with Processing. If you would like a refresher course on Processing you can take a look at their Getting Started guide.
The latest version of Kaleido can be found at the Download page.

In this tutorial we will learn to use Kaleido to help us write a simple program in which a ball will follow your mouse around. This means that, in each frame of the animation, our program will fill the canvas background and draw a ball at the the mouse position.
|
|
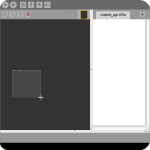
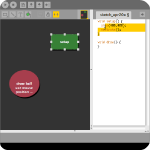
So first let's make a ball shape to represent our ball. Click on the shape tool  and hold down the mouse button to see the available shapes. Click on the circle tool and hold down the mouse button to see the available shapes. Click on the circle tool  and your cursor should change into a crosshair and your cursor should change into a crosshair  . .
|
|
Make a circle on the drawing area by clicking and dragging the size of the shape. When a shape is selected, it will have a yellow highlight around it  , and the small square handles allow you to resize the shape. , and the small square handles allow you to resize the shape.
|
|
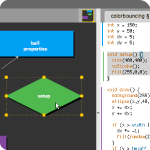
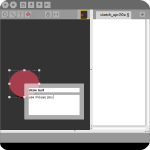
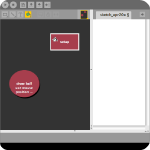
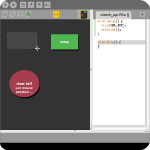
Open the label editor by clicking once on our selected ball. Let's type in "draw ball" in the first field, and "use mouse position" in the bigger field. When you're done, click outside the label editor to save. Whenever you want to cancel out of the label editor without saving, simply hit the escape key  on your keyboard. on your keyboard.
|
|
Next let's make a shape to represent our program setup. Let's use the rectangle shape again  and this time simply label it "setup". Since we think of "setup" and "ball" as very different sorts of things, let's color the setup rectangle a different color by clicking and holding down the paint bucket button to select green and this time simply label it "setup". Since we think of "setup" and "ball" as very different sorts of things, let's color the setup rectangle a different color by clicking and holding down the paint bucket button to select green  . Once your mouse has changed to a paint bucket cursor . Once your mouse has changed to a paint bucket cursor  , click on the shape you want to color. , click on the shape you want to color.
|
void setup() {
  size(400,400);
  noStroke();
}

void draw() {
}
|
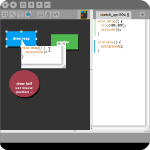
Now let's link some code to our shapes. Type the code on the left into the text area. This prepares the canvas we need, and gives us a code stub in which to fill in the animation code.
|
|
Link the setup method code to the setup shape  by clicking on the shape, clicking on the link button in the toolbar (notice that the link button stays highlighted like this by clicking on the shape, clicking on the link button in the toolbar (notice that the link button stays highlighted like this  ), and selecting the code. A linked shape appears brighter and linked code is marked in the margin. Selecting any part of linked code will cause the shape to be highlighted in gray, and selecting the shape will cause the linked code to be highlighted. ), and selecting the code. A linked shape appears brighter and linked code is marked in the margin. Selecting any part of linked code will cause the shape to be highlighted in gray, and selecting the shape will cause the linked code to be highlighted.
|
|
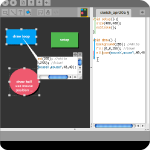
Next let's also make a shape for the draw method. This time let's select the code first, and then select the rectangle tool . Notice now that the cursor is a crosshair and the link button is highlighted. Draw a shape, and the link will automatically be established. Let's label this shape "draw loop" and color it blue.
|
|
We can also use code windows to write our code. Double-click on "draw loop", or click on the code window button  to open the shape's code window. to open the shape's code window.
|
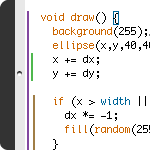
void draw() {
  //white
  background(255);
  //blue!
  fill(0,0,255);
  ellipse(mouseX,
	mouseY,40,40);
}
|
Inside the code window, fill in the draw method with the code on the left. As you type, you can see that any changes you make in the code windows is reflected in the main text area. This can be particularly useful when you are working with multi-file projects.
|
|
Our program is pretty complete, and just to finish our drawing, let's link the line of code that draws the ball to the our ball shape  by selecting the code, clicking on the link button by selecting the code, clicking on the link button  , and clicking on the shape. Notice that any code can be linked to multiple shapes, although each shape can only be linked to one continuous fragment of code. , and clicking on the shape. Notice that any code can be linked to multiple shapes, although each shape can only be linked to one continuous fragment of code.
|
Let's run the program! Click on the run button 
To learn more about Kaleido, explore the rest of this guide, take a look at the example projects by accessingthem from the File → Example menu, and join the discussions in the forum!
|


 |
Shapes
Click and hold down to see other options such as  and and   . All shapes hold a title and description, and can be linked to code. Any new shape will be filled with the color indicated in the Color Fill button at the time of creation. . All shapes hold a title and description, and can be linked to code. Any new shape will be filled with the color indicated in the Color Fill button at the time of creation.
|
 |
Connectors
Plain basic connections in three style options (arrow, dotted, etc.), which can be attached to shapes or lft dangling. Connectors can be labelled, but not linked to code.
|
 |
Text Box
Creates a text box with a transparent background that holds a description.
|
 |
Color Fill
Select this tool and click on a shape to fill it with the selected color. The currently selected color will be used to fill newly created shapes.
|
 |
Code Window
Opens code windows on selected shapes that have been linked to code.  will hide the code windows of the selected shapes. will hide the code windows of the selected shapes.
|
 |
Lock
"Locks" drawn elements to prevent them from being moved or resized. Elements can be unlocked via the  button. Drawn elements that are in locked mode will appear as if they are pinned to the canvas, while unlocked elements drop a shadow and appear as if "floating". button. Drawn elements that are in locked mode will appear as if they are pinned to the canvas, while unlocked elements drop a shadow and appear as if "floating".
|
 |
Link
Initiates a link between visuals and code, starting with the current selection in either drawing area or text editor. If a link currently exists (each drawn element can be linked only to one code fragment at a time, although any given code fragment can be linked to multiple drawn elements), the link can be removed by using the  button. button.
|

| Note: the current Kaleido release is available for Mac only, although we're working on changing that soon! |
 Z Z |
Undo
|
| Y |
Redo
|
| X |
Cut
|
| C |
Copy
|
| V |
Paste
Pasting text into the drawing area will create a new text box to hold the clipboard contents. Pasting a linked shape into the code editor will paste a copy of the code linked to the copied shape.
|
| A |
Select All
|
| D |
Select None
|
| / |
Comment / Uncomment
|
| ] |
Increase Indent
|
| [ |
Decrease Indent
|
| F |
Find...
This search function currently only searches the code. Search functionality for the drawing area is planned for future releases.
|
| G |
Find Next
|
| T |
Open Code Window
|
 T T |
Close All Code Windows
|
| L |
Lock Selected Element
|
| L |
Unlock Selected Element
|
| = |
Zoom In
|
| - |
Zoom Out
|
| 0 |
Actual Size
|
| drag |
Panning
|
| <spacebar> |
Expand Element (in nested elements)
|
| <backspace> |
Collapse Element (in nested elements)
|
| <delete> |
Delete Element
|
| F2 |
Edit Element Description
|
| ↑ |
Select Container Element (in nested elements)
|
| ↓ |
Select Contained Element (in nested elements)
|
| ← |
Select Previous Element
|
| → |
Select Next Element
|
|